
Part three of my July CC focus. Today I'm talking base scenarios!
There is nothing that will determine the momentum of a CC campaign more than a successful base assault. Not only are you taking down a huge chunk of resources with the base itself, you're almost certainly taking down a critical piece of support, such as repair yards. Oh and there are these things called victory points. They might be important. A successful base assault gives your team at least one, and likely two or three depending on the location. A base going down without reprisal almost always marks the beginning of the end for the losing side. Think about it. You lose 25 resources from the base, probably 15-20 for the planet, and then maybe a repair yards. Look at Corellia itself. If a Rebel can take that, it's 45 resources, a repair yards, and 3 victory points. Yikes.
It's a good thing then that these scenarios are heavily slanted in favor of the defender. Yes, the defender is still second player, but they get to choose the scenario from the three base defense options. Not one of them is nice to the first player, or even remotely flippable under any circumstances. They're all straight up advantages for the defender. If you're gonna take out a base, you're gonna earn it.
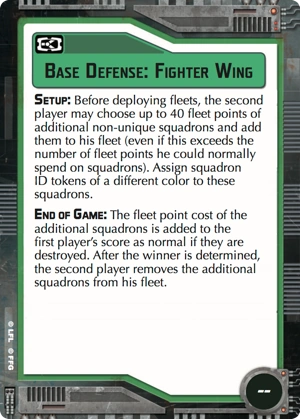
While all three are good for the defender, I think the one that gives the least benefit is Fighter Wing. 40 points of generic squadrons doesn't get you all that much. With a few exceptions, this generally means 3 extra squadrons. Now that's no bad by any means, but it also means you need a way to command them. Since your fleet is probably built around the number of squadrons you need to activate, this squadron surplus can be hard to maximize. If you can, awesome. Like I said, you can't call any of the base defense objectives bad. This one is just the least good.
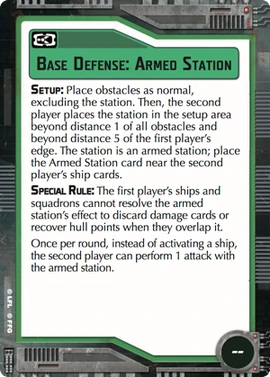
Armed Station is the next up on my power scale. It provides the defender a good source of firepower and an extra activation. If you opponent wants it to stop, they have to divert firepower away from your ships to make the thing go away. There's really not a whole lot of downside here. The best time to take it is when you're defending against a fleet that out activates you by just one. By adding the station, you can deny that critical last/first advantage.
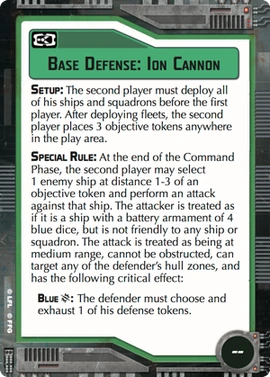
This is by far my favorite objective of the bunch. Everything about this objective is just brutal for the attacker. The tokens are placed after deployment, so avoiding them is near impossible. The first one fires before anything even activates. Straight off the bat, one of the attacking ships is going to take 4 blue dice to the face. Or more likely to the ass since the ions can target whatever hull zone they like. Here's the critical part, though: unlike the normal yellow objective, these tokens don't get removed. That means unless you have a mitigation plan, you are going to take 6 turns of blue death. The one weakness of this objective is a Strategic heavy attacker. But I'll tell you what, even with Strategic running around, it's hard to get those tokens out of the way. If you have Strategic as a defender take this objective without a second thought.
As with many things CC, the tactics of the fight are less important than the strategic timing. Even if you're crushing the opposition in a campaign, base assaults can be difficult because of defensive advantages combined with the fact that your opponent is going to throw their healthiest fleet into defending the base. As the attacker you need every edge you can get. You need a robust fleet capable of taking some damage and bouncing back for the next round. The problem is the best time to launch the attack is when you have the initiative, meaning you're losing or at best tied (as the Rebel). Having campaign initiative allows you to wait and see what the enemy leaves you with for the third game (You aren't playing 6 player?! Why the hell not?!). If they give you an opening to match a stronger fleet of your own against a weaker fleet of theirs, that's your opening. Of course, if you're currently losing the campaign, your opponent could very well have three robust fleets. Hence why the timing is really hard.
The best example I can think of came just last week. I'm currently in my second Vassal CC with JJ Juggernaut, Caribbean Ninja, Moodswing, Miferr, and Zanos. JJ, Moodswing, and I are the Rebels, with Ninja, Zanos, and Miferr playing the Imps. JJ has not be having a good campaign. He tried a Leia list that just did not work. He was effectively crippled after a crushing round two defeat to Miferr, so he retired his fleet. This left the campaign at 2-2. Mood, however, was doing fairly well and I was on a hot streak. We opted to have JJ launch a very conservative Hyperlane Raid, which was defended by Miferr. Zanos in turn launched a Show of Force, which Mood to defended. That left us knowing that I would be playing Ninja with first player. I had mauled Ninja pretty well during the first turn of the campaign, so despite Ninja having a healthy fleet, JJ and I thought we had a decent opening for a base assault. It was a very close game (DAMNED IONS!!!), but I pulled it out. We're still waiting for Zanos and Mood to play, but regardless of the outcome, what was a 2-2 campaign is suddenly a 5-2 campaign in favor of the Rebels.
No comments:
Post a Comment